7.09.2012

Wedded Bliss

Tomorrow marks my parents' 36th wedding anniversary.

Who wouldn't want these goons as their role models and genetic precursors...


Given the option, I'd pick them all over again. That's got to mean they did something right.


Be proud of your love for one another and the family that it has built. 

We all are. 

Happy Anniversary! 

6.15.2012

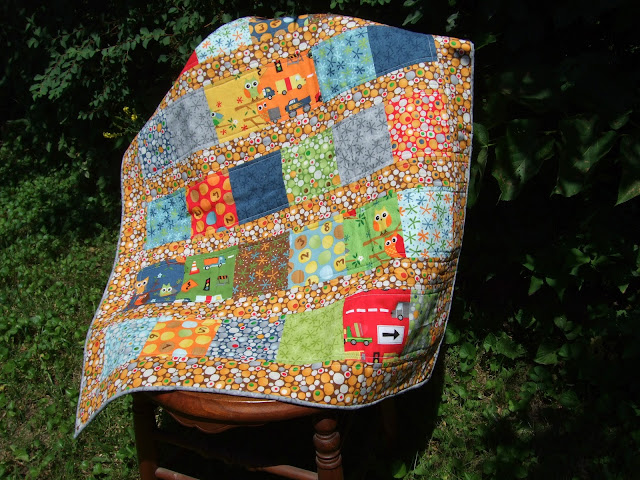
Easy Kiddo Quilt


I'm a sucker for a sale....

Regular price - $4.99
Sale price - $4.95

SOLD!

I mean think of all those things I could do with the four pennies saved. Endless possibilities really. 

Honestly, I'm not THAT bad although I did find this fabric on sale and had to put it to use. 


Put an adorable hoot owl on something and I'm out the door with a bag over my arm. 

I made this simple baby quilt and did the quilting myself to save some dough. 


Wanna be cool and crafty like me?

You'll need
- 1 Charm pack (mine is Ten Little Things from the Moda brand)
- 1 yard of coordinating fabric for the backing
- 2/3 yard for borders
- 1/3 yard for binding (this may be a little generous but it depends on how thick you want the binding)

Lay out your squares in a pleasing manner. If you have a super keen eye, you will notice that I held some of mine back to make a coordinating taggie blanket.


Sew together your horizontal rows first.


Cut four 2.5 inch strips the width of your blanket.


Stitch them in there.


Since I had enough fabric left over, I did a 3 inch border all the way around the edges.

Layer your backing fabric, batting and top fabric.


I chose to quilt it myself to save a little dough. Dinero. Moolah.


Trim your edges clean and add the binding. I chose a neutral gray since the quilt is so busy.


Here's the taggie blanket to join.

4.06.2012

Easter Eggies

That's right folks. Easter is around the corner. Well, this weekend actually. 

I'll be spending it in Florida, but I wanted to make sure the house was a little festive since I'm leaving Ryan behind. 

I went with a paper mache type of Easter eggs, but with embroidery thread instead of paper. Another Pinterest find.


Hit up your local craft store for some embroidery thread. I went with the pastels (on the right) and my crafting buddy, Molly, went with the green and blues color scheme (on the left). 

It takes a whole skien per egg so buy away. Trust me, it's hard to choose once you get absorbed in that store isle. 


The paste comes from liquid starch and flour. 

Recipe:
One cup of liquid starch to half a cup of flour.


Should look a little like this once you whisk it together.

You'll also need balloons. We went with water balloons (not the best choice as you will come to see). Regular balloons may work as well as long as you don't blow them up to full capacity.


 Don't forget the wine and snacks. Uber important.


Let me share what our water balloon issue was...


They are IMPOSSIBLE to blow up.

Okay, maybe not completely impossible, but super difficult.

Just look at that face.


We even got this guy involved. 


Then we discovered the secret.

I know you all have one of those exercise balls that were all the rage about 5 years ago. Go dig out the pump for it.

Works like a charm.


We chose to do 18 balloons each. Once they are all blown up, dip your embroidery thread in the starch goo.

We started this project with gloves, but just get dirty. Works much better.

Unraveling the thread and just piling it in worked best for us. There will still be frustrating knots, but that's what the wine is for.


Wrap the balloons in a haphazard manner.


Lay your wet eggs on wax paper to dry. Ours took overnight so be patient.


Once dry, pop the balloons.

I took a straight pin and scratched off the majority of the left over starch bits. I'm a pretty big perfectionist and still couldn't bring myself to get them perfectly cleaned, but they just have a powdery look to them.


Hope everyone has a wonderful Easter!

4.03.2012

Spring Wreath

I've been your average Martha Stewart in the garden these days. You can all relate, right?

I needed something to keep me busy after the sun went down. It's been awhile since I've tried my luck at a wreath. 

Check this baby out.


Naturalistic right?

Well, the sticky wreath part is anyways. I can't take credit for that. It was made by the gentle hands of some soul at Hobby Lobby. Probably Mexico actually, but we won't go there. 

I had a bunch of extra fabric just begging to be put to use. I decided on those fabric flowers which gave me the opportunity to buy some cute buttons and lace. Who doesn't love an excuse to buy those?

I bought a thick lace (2 inches) for the outside and a thin, frilly lace for the middle. 

You'll also need some scrap felt, scissors, thread and a hot glue gun. 


I made my fabric 1.5 inches wide. Then measured the fabric and two laces to about 10 inches.


Loosely stitch through your lace so that you can pull it tight to make a circle. The pictures will probably do better than that pathetic explanation I just gave.


Then, do the same thing with the next layer.


And the last...


Layer those puppies on top of one another.


Place your button in the middle and tie to all the way through, with a small circle of felt on the back, to keep it all together.


Repeat times 5 if you're cool like me.


Hot glue them to your wreath and you're done. 


No excuses for an unwelcoming front door. 

3.29.2012

Tiered Flower Pots

All everyone can talk about is how wonderful the weather has been.

I'll admit that I've fallen prey to the garden center already. I'm a sucker for cute little plants in precious little containers.

I found the idea for a tiered flower pot months ago and have just been itching to put it together. Here's my finished project.


Way easier than I thought it would be. Honestly, 15 minutes and you're done.

You'll need:
- ascending (or would it be descending) sizes of tera cotta pots
- base for your largest pot
- a wooden dowel
- cute little plants in precious little containers


I needed a second hand for this part. Sort of imaginary stack your pots, one on top of another, to get an idea of how tall it will be. I sat the top pot on the inside rim of the one below it. 

Cut your dowel to 5 inches less than however tall it measures. Mine measured about 28 inches tall so I cut mine at 23 inches. That way it won't be poking out of the top. 


Place your dowel and fill around it with dirt to that first ridge.

I wanted my pots to stack towards the back because I am only going to place plants on the front side. If you want to have a 360 degrees tier then you can stack them centered.


Place the next pot over the dowel and fill with with dirt.

Maybe I should hit up Miracle-Gro for some money. That's some pretty good strategic product placement.


Repeat with your next tier.


Anyone notice I mixed soils?

I'm dangerous like that...

Last tier peeps. 


Here are the plants I chose. Since I'm placing mine on the porch, I went with partial shade plants because they will only get a few hours of evening sun.


Here's what they are in case some one wants to be a total copy cat.

Bottom Tier: Techno Heat Electric Blue Lobelia and Sunsatia Cranberry Nemesia
Second Tier: Toucan Tango Brachyscome
Third Tier: Walkabout Sunset Lysimachia
Top Tier: Fiber Optic Grass

I completely encourage your own creativity, though. Who knows? It may look better than mine.

Probably not, but try anyways.


Don't pay that hideous front door any attention.

Did it help that I pointed it out?

I'm hoping that in a few weeks they will all get intertwined and dangly. If they do, I'll get a follow up picture.

I planted a lot of other things today and have dug up a couple new flower beds. There is definitely something satisfying about digging in the dirt. I love how everything looks clean and new.

Happy Spring!